![]()
How to Draw: Loric
Last time we got some tips on drawing Cymbril. Now it's time to draw Loric!
Loric's head is drawn in what is called a “three quarter view.” We can see three quarters of his face from one side. This view is a little tricker than a front view, but with practice, you can do it!
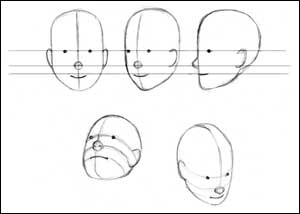 If you'd like a few extra tips on drawing heads before you begin your Loric, take a look at the simple drawings of heads to the right. These heads are drawn from different angles, or points of view. You may remember the lines that divide the different sections of the face from the “How to Draw Cymbril” lesson. There is a horizontal line upon which the eyes, nose, and mouth rest. The ears fall between the eye and nose line. If you keep these lines in mind when you are drawing a face, you can draw that face from almost any angle!
The head is somewhat egg-like in its shape. Imagine that the reference lines for the features of the face are curving around that egg shape, like strings tied around the egg. When someone looks up, the eye, nose, and mouth “lines” curve downwards. If you keep the ears in position in between the eyes and nose, they appear to move down further on the head. Similarly, if someone is looking down, the reference lines appear to curve upwards. The ears will look as if they have moved higher up on the head. If you would like to practice, look at photographs you have, or pictures of people in magazines. See if you can imagine where these reference lines would be.
While you are drawing Loric, imagine that you're drawing his head in three-dimensional space. Imagine how an egg looks when you hold it in front of you. Imagine that you have drawn the guidelines on the egg.
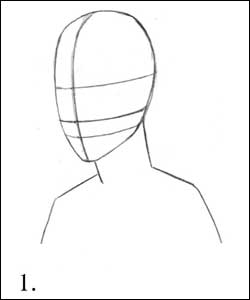 1. Start by drawing an egg shape that tapers at the bottom. The left side of the egg should be slightly flatter than the right. About one third of the way from the left side of the egg, draw a curving vertical line. This is the center line of the face. Because the face is turned slightly away from us, the line appears to the left of the center. It is curved because we want to fool the viewer's eye into thinking that they are looking at an image that exists in three dimensional space.
Next, draw a slightly curved horizontal line almost halfway down the egg shape. This is the line where the eyes will fall. Divide the lower half of the oval into thirds by drawing two more curving horizontal lines. These are where the nose and mouth will fall.
Add some lines for Loric's neck and shoulders.
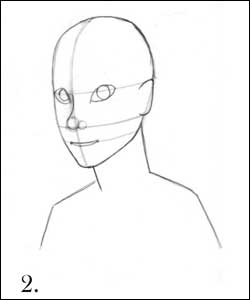 2. Start adding shapes to represent the eyes, nose, and mouth.
For each eye, lightly draw an almond shape. The outer corner of the almond shape comes to a point at and rests on the eye line. The eye that is farther away from us, on the left of the egg shape, will look a little “squished” compared to the closer eye.
For the tip of the nose, lightly draw a large circle resting on the nose line, and just to the left of the vertical line. Lightly draw a small circle to the right for the nostril area. Draw a line curving from the edge of the large circle up to the point where the vertical center line and eyeline meet. This is the bridge of Loric's nose.
For the mouth, find the center of each eye and draw a small dot below on the mouth line.
For the ear (we can only see one from this angle) draw a simple half oval shape on the side of Loric's head. Make it slightly pointy at the top. Remember, as a general rule when drawing a person's head, the top of the ears will line up with the eyes, and the bottom of the ears will line up with the nose.
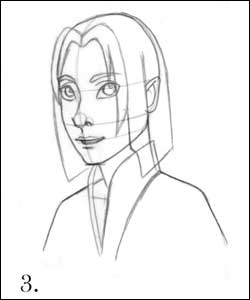 3. Start adding details!
Refine the shape of Loric's eyes. Draw a small line starting at the outside corner above each eye curving towards the nose. These are Loric's eyelids. Draw a small circle inside the iris of his eye. Later, this will become a highlight. Draw in the eyebrows.
Refine Loric's nose. Add a “comma” shape for his nostril. Draw in the tip of his nose.
Refine Loric's mouth. Add a soft “M” shape above the mouth for Loric's upper lip and a short line below his mouth for his lower lip.
Draw Loric's collar. Begin sketching in basic shapes for his hair. His bangs form almost a heart shape around his face. Don't forget that Loric's hair is draped over the collar of his shirt!
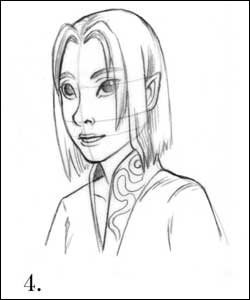 4. More details.
Now it's time to refine your lines more. Darken the lines you like. At this point, if you don't need them anymore, you can erase all of your guidelines. Add some wrinkles to Loric's shirt. Add some more lines to indicate his hair. Don't forget his ear peeking through! Draw some vertical lines behind his ear to show that his hair is pushed behind it. Add the swirling pattern on his collar. You're almost finished!
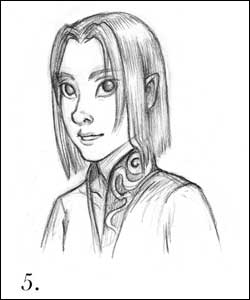 5. Final details.
Now you can finish off your drawing any way you'd like. You can add some more details and shading to Loric's hair and clothing. You can erase the part of Loric's eye and eyebrow that are covered by his hair if you'd like, or you can leave it in. (Sometimes when I do a sketch, I like to leave the eyes showing through the hair to show the expression better. Those of you familiar with manga and anime might recognize this technique!)
You're finished!
I hope you liked drawing Loric and that you learned some tips for drawing faces from different angles.
(back to Emily)


