![]()
How to Draw: Cymbril
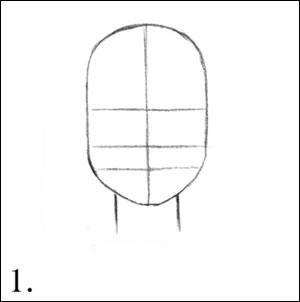
 1. Start by drawing an oval. Slightly taper the bottom of the oval and flatten out the sides a bit.
Add guide lines: Draw a vertical line down the center of the oval. The line divides the face in half and is used to place the nose and mouth. Draw a horizontal line almost halfway down the oval. This is the line where the eyes will fall. The forehead takes up almost half of the face! Divide the lower half of the oval into thirds by drawing two more horizontal lines. These are where the nose and mouth will fall.
Add vertical lines to create Cymbril's neck half way between the center line and each side of the oval.
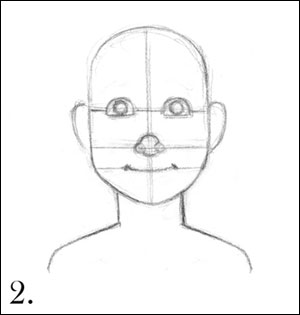
 2. Start adding shapes to represent the eyes, nose, and mouth.
For each eye, lightly draw a half circle lying on its side along the eye line. The eyes should be about one eye width apart from each other. Add circles inside for Cymbril's irises.
For the tip of the nose, draw a large circle where the nose line and the vertical line intersect. Add two smaller circles for the nostrils.
For the mouth, find the center of each eye and draw a dot on the mouth line below it. Connect the two dots with a curved line. This will be Cymbril's mouth.
For the ears, draw simple half oval shapes on the side of Cymbril's head. As a general rule when drawing a person's head, the top of the ears will line up with the eyes, and the bottom of the ears will line up with the nose. This is very handy to keep in mind, especially when drawing a head at different angles!
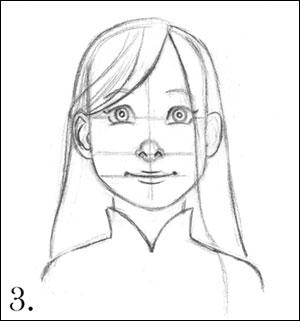
 3. Start adding details!
Refine the shape of Cymbril's eyes. The outside corners point down slightly, and there is an indication of her eyelashes there. Curve the bottom of the eye up slightly, to show that Cymbril is smiling. Her smile will affect the expression in her eyes, too.
Draw small, upside-down "u" shapes for Cymbril's nostrils on the little circles of her nose.
Refine the shape of the mouth. Add a small curving line above and below the mouth to indicate Cymbril's lips.
Add eye brows, and begin sketching in Cymbril’s hair and ears. Draw her collar.
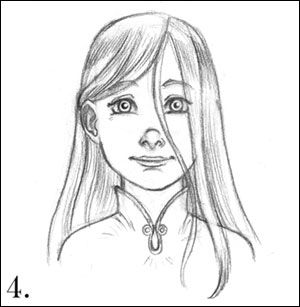
 4. Finish off all the details.
Fill in Cymbril's irises and pupils. You can leave a little white dot in her pupils to indicate a highlight in her eyes. Finish her hair. Don't forget the strand of hair that always seems to fall in her face! Add the details on her ears, face, and clothing. Erase the guide lines you drew in Step 1. You're finished!
(back to Emily)


